Silent Night Christmas Cake: A Time-Honored Tradition
Silent Night Christmas cake is a cake that’s themed on the depiction of the silence of Christmas midnight. Amid the cheerful decorations, heartwarming carols, and twinkling lights, one tradition stands out as a symbol of culinary delight – the Silent Night Christmas cake.
Baking the Foundation of Joy
Few things capture the essence of the holidays, like the aroma of a freshly baked Silent Night Christmas cake wafting through the air. From mixing the ingredients to carefully decorating the cake, every step is a labor of love that culminates in a masterpiece that embodies the season’s spirit.
The Art of Flavor Fusion
A harmonious blend of flavors dances on the tongue in the Silent Night Christmas cake.
A Feast for the Eyes
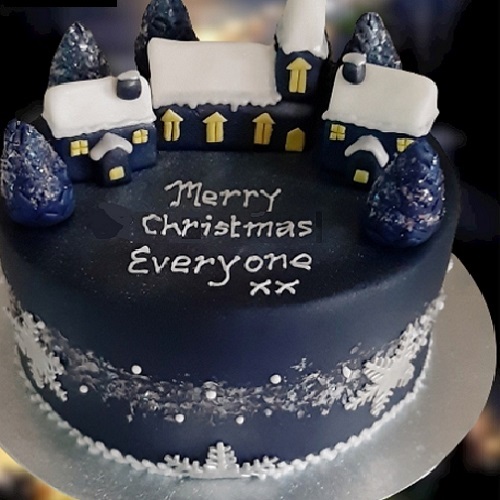
Just as the holiday season is a feast for the senses, the Silent Night Christmas cake is a feast for the eyes. It is adorned with intricate designs, sugared fruits, and a dusting of powdered sugar resembling freshly fallen snow; this cake is a work of art that takes center stage on any festive table.
Baking Your Silent Night Christmas Cake
Gathering the Ingredients
Ensure you have the finest ingredients on hand before beginning on this culinary adventure. Despite the variations in ingredients, indulgence remains the same.
A heartfelt recipe for batter
Take a large mixing bowl, and combine the flour, cocoa powder, and a pinch of holiday magic. Add the soaked dried fruits and gently fold them, infusing the batter with plump sweetness. This step encapsulates the spirit of sharing joy through delectable creations.
Baking to Perfection
In a well-greased cake tin, pour the batter and bake. During baking, chocolate and spices fill the house with an irresistible aroma. It is the moment when anticipation turns into excitement as you eagerly await the masterpiece that will soon emerge. Here easy marzipan cake decorations will be introduced in this silent night christmas cake
Decoration: From Creativity to Elegance
Once the cake has cooled, the real fun begins – decorating! Let your creativity flow as you drizzle velvety ganache, arrange candied fruits, and sprinkle powdered sugar.
Lets Start Our Recipe
Ingredients
- Navy blue fondant/sugarpaste icing – 3 pckts
- Icing sugar to dust and make glacé icing
- Brandy/gin/vodka, or use freshly boiled and cooled water – 2 tbsp
- Apricot jam – 2 tbsp
- Christmas fruit cake – 8-inch round cake or check walnut cake or almond cake for this recipe
- Natural marzipan – 500 g
- White fondant/sugar paste icing – 50 g
- Yellow fondant/sugar paste icing – 10 g
Instructions:
Step 1
- Make the cake decoration the day before by gently heating the jam to loosen it in a small pan. Sieve the mixture into a small bowl,. Brush sieved jam over the top and sides of the cake. Leave aside.
- Step 2
- Roll out the marzipan and dust a work surface with icing sugar to ensure it covers the cake completely (see GH Tips). With your hands, lift the cake and gently smooth it into place. Remove excess. To harden the marzipan, leave it overnight at room temperature.
- Step 3
- After marzipan hardens, dust a work surface lightly with icing sugar and roll out 500 grams (1 pound, 2 ounces) of blue fondant or sugar paste until large enough to cover the cake. Use brandy, gin, vodka, or cooled water for moistening. Using your hands, smooth the rolled blue icing over the cake. If there is any excess, cut it off. In the next step, transfer the cake to a cake stand or plate. Leaving the blue icing at room temperature overnight will help it harden. Keep going if you don’t have time.
- Step 4
- To make the houses and church, line a baking sheet with parchment paper. To make the church, steeple, two houses, and tower, use about 100g (3112oz) of blue icing. Porches and chimneys.
- You can get clean, sharp lines by trimming the edges with a knife. Arrange the pieces on the parchment-lined baking sheet.
- Step 5
- Paint a tiny amount of white icing to create roofs for the porches and save it. From the remaining white icing, form roofs for the houses, churches, and steeples, but do not attach them to the blue buildings. Keep all these prepared shapes on the prepared baking sheet and let it dry so their shape may not break. You can make tiles on the roofs using a knife or piping nozzle.
- Step 6
- Lightly dust your work surface with icing sugar before placing the reserved white icing. Make the porch roof panels by cutting out four small rectangles. On the lined baking sheet, place it and set it aside.
- Step 7
- Now, re-dust the work surface with icing sugar and roll out the yellow icing on a thin surface. Prepare the windows and doors by cutting out shapes with a sharp, small knife. Lift carefully onto the baking sheet.
- Step 8
- Make the trees with the remaining 150g (5oz) white icing by shaping them into cones approximately 5 cm (2in) tall.
- Cut into a tree shape with scissors, starting from the top, making cuts all around to resemble foliage. Make sure you repeat this process with all of the cones. Put on a baking sheet. Leaving all the items at room temperature overnight if you have time is preferable – if not, continue to step two.
- Step 9
- To stick the buildings together, use a small paintbrush and scant water. Sprinkle icing sugar/luster/edible glitter on the roofs and trees if you wish to show them enlightened.
- Step 10
- Put some water on the cake surface and stick the buildings and trees on it. Give the cake a glow by dusting or spraying it with luster. Apply liter water on its sides, decorate it with white fondant trees, and put little white fondant balls to show snow on its sides.
- Step 11
- Sift some icing sugar into a small bowl to make soft plazed icing. You will need to add just enough water to make it thick enough to pipe. Put the scrapings into small piping bags fitted with plain nozzles (size 2 or 3). Decorate the cake with your festive message. Serve after it has dried. To complete the effect, we also piped some snow onto our chimneys.